Category: how to

  • Freedom from Adobe

    Freedom from Adobe

    Freedom from Adobe

    If you want freedom from Adobe because you have finally had enough of the all their BS

    You had to accept the latest new TOS (Terms of Service) there was no other option if you needed to keep using the applications and it included suck features like
    The use of images in the Adobe Creative Cloud for product training, which includes images that are temporarily uploaded to their cloud by using any tools that use server side generative AI features.
    Spying on what you are doing in their products.
    Wanting to act like a net-nanny, yes they have an an AI looking at all images arriving in the adobe cloud that kicks out any images it decides do not meet community standards, these are passed on to a human for verification and if deemed actually unacceptable may be passed on to authorities. All you see is a “does not meet community standards warning.
    Not to forget the constant fingers in your wallet.

    like I have and have started to actively work on moving away from Adobe products.

    I quickly discovered I am stuck until my yearly contract runs out, unless I want to pay a hefty early cancellation fee.

    00Days
    00Hours
    00Minutes
    00Seconds

    Countdown
    until I can cancel with little to no penalty and have to do it before the dam thing automatically renews for another year.

    Did you know in the Adobe fine print that the monthly subscription you signed up for is actually a yearly subscription paid monthly? AND to cancel they fine you a 50% early cancellation fee for any remaining time if you try to cancel mid term.

    Finding your subscription anniversary date

    And the location of the cancellation process

    This turns out to be a 5 step process to locate both your subscription anniversary date and the location of the cancel plan option.
    Step 1: sign in to your adobe account

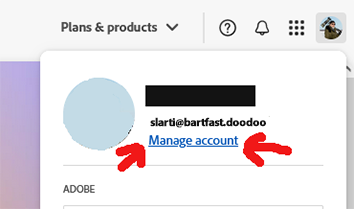
    Step 2: select your icon/avatar in the upper right

    Step 3: select the Manage account link

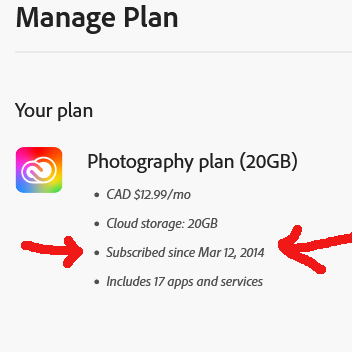
    Step 4: select the Manage plan bubble, this will open a popup

    Step 5a: The popup will show your original subscribed date.

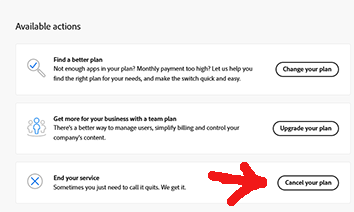
    Step 5b: And finally near the bottom right side of the popup page it should include a cancel plan option that triggers the cancellation process.

    On1 PhotoRaw 2025 coming in October!

    My current pick for a replacement to Adobe is getting a major update to the 2025 version in October with many new AI enhanced features.


  • 5 mic shootout

    5 mic shootout

    Here’s my comparison of 5 different relatively inexpensive (under 200$cdn) mic options.

    Over time as I started to make videos I found the sound quality was bugging me.
    So I embarked on a mini-quest to improve on the audio I was capturing.
    Eventually ending up with four external mics and the internal camera mic
    (I also have a few studio mics but that is for another time.)

    Here is a video I made while recording from all 5 sources at the same time in a couple of different locations..
    (Editing that into a single video was quite a chore!)

    https://www.youtube.com/watch?v=h1KMh1QC8po

    Summary of my findings

    Camera  Internal mic

    Cost: free, built in to most cameras.
    Power: internal camera battery
    Pros: free, always have it with you.
    Cons: usually terrible poor quality sound, picks up wind, environment and even camera internal operating noises.


    Apex 182

    Cost: runs around 20$us/26$cdn
    Power: none.
    Pros: Needs no battery, and is stereo, very inexpensive.
    Cons: no easy way to clip it to anything. output levels are low.


    Audio-Technica ATR3350

    Cost: runs around 29$us/50$cdn
    Power: needs a LR44 type battery that lasts about 10-15 hours.
    Pros: cheap, not bad sound
    Cons: no battery life indicator, you never know if it has quit on you.
    excessively 6 meter/20 foot long ever tangle cord.


    RØDE smartlav+

    Cost: runs around 89$us/99$cdn
    Pros: powers itself from the recording device (needs to be compatible), small easily placed.
    Cons:  None, it does need a RØDE SC3 3.5mm TRRS to TRS Adapter to connect to recorders instead of smartphones
    Hint:  A kit with the lav and adapter can sometimes be found for almost same price as lav by itself, much more expensive if bought separately

    RØDE VideoMic

    Cost: runs around 150$us/189$cdn
    Power: standard 9v battery
    Pros: good quality construction, uses standard easy to find 9v battery
    Cons: large and needs to be camera mounted, can pick up unwanted directional background sounds.


    Links

    To my top product picks (yes they are affiliate links!).

    RØDE SmartLav+
    Adorama http://bit.ly/2vxfjXH

    RØDE SC3 trrs to trs adapter
    Adorama  http://bit.ly/2KHMe0j

    RØDE SmartLav+ and trrs to trs bundle!
    Adorama

    Zoom H1n
    Adorama http://bit.ly/2vAYI56

    RØDE VideoMic
    Adorama  http://bit.ly/2KFQr4M

    Dead Cat 
    Adorama

  • Filter tests for long exposure, unusual, infrared

    Filter tests for long exposure, unusual, infrared

    Long Exposure Filter Tests

    Filter tests or what happens when I find myself out with a new Hoya R72 infrared filter, a Lee big stopper filter and a piece of shade 10 welding glass.
    If you want to see any of the images larger just “Right click” them and select “View Image” in FireFox or “open image in new tab” in chrome and safari!
    Internet Explorer does not follow normal web standards and this option is missing.

    The filter tests

    Original – unprocessed
    Original scene
    Original scene
    ISO 100 f/13 1/60second 40mm
    Lee Big Stopper
    Original
     

    Processed
    Original from bi
    Original from big stopper
    iso 100 f/18 24seconds 40mm
    processed from big stopper
    processed from big stopper
    iso 100 f/18
    Welding Glass
    shade 10
    Original
     

    Processed
    Welding glass original
    Welding glass original
    iso 100 f/8 45 seconds 40mm
    Welding glass processed
    Welding glass processed
    iso 100 f/8 45 seconds 40mm
    Infrared
    Hoya R72
    Original
     

    Processed
    Infrared original
    Infrared original
    iso 800 f/8 44 seconds 40mm
    Infrared processed
    iso 800 f/8 44 seconds 40mm

    I was out testing my newly acquired Hoya Infrared R72 filter from Vistek .
    When I decided to also test out how a piece of shade 10 welding glass (8$) would handle the scene when used as a long exposure filter, something I had read about on other sites.
    A use it definitely was not intended for.

    All image processing was done in Adobe CC LightRoom 5

    The first image pair for comparison is from a Lee Big Stopper 10 stop neutral density filter.

    As expected the color from this excellent filter was very good to start with, and color correction and processing was very easy.

    The second image pair is from the shade 10 welding glass.

    It is not intended for passing true color and it introduced a very strong green cast that was fairly difficult but not impossible to semi color correct.
    The glass does alter and remove some of the light spectrum so getting to a true color balance my be tricky to next to impossible
    It however is passable and at 8$ could be used in a pinch for anyone wanting to try out long exposure photography before deciding on spending the 150$ or so for the real thing.
    The shade 10 welding glass also appears to be about 3 to 4 stops darker than the real 10 stop photo filter.
    As such initially calculating exposure was completely hit and miss using the histogram to get to something passable.

    The third image pair is from the Hoya R72 infrared filter.

    It cuts out most of the entire visible light spectrum and thus cannot be color corrected at all.
    Resulting images must be processed as monochromes. False color image can be produced with appropriate post processing techniques.
    High point of an infrared filter is it works best in the hot mid day sun, when normal photography produces lackluster images.

    Attaching the shade 10 welding glass

    NOTE: if you try this we are not responsible for anything at all that might happen.
    It is easy if you have a petal lens hood, we just used a couple of rubber bands!
    Just be very careful not to touch and damage the front element of your lens with the welding glass if you decide to try this,
    it is much safer to first mount a cheap UV filter to the lens to protect it from any accidental contact with the heavy glass.

    Attaching welding glass

    mounting welding glass, with rubber bands
    mounting welding glass with rubber bands
    mounting welding glass with rubber bands
    mounting welding glass with rubber bands
    mounting welding glass with rubber bands

    In the next image set I included an x-rite colorchecker passport (really helps with getting images color corrected!) to try to show the effects of the deep green filtration.
    If you examine the color chiclets closely you will see that some of them have gone very dark indicating the colors that have been completely removed by the filter,
    which makes getting back to a accurate color balance very difficult if not impossible.

    Color corecting welding glass

    Original
    no filters
    welding glassprocessed
    base image no filter
    base image no filter
    Welding glass original
    Welding glass original
    Welding glass processed
    Welding glass processed

  • Pete’s how-to’s build a DIY Camera Slider

    Pete’s how-to’s build a DIY Camera Slider

    DIY Camera slider
    DIY Camera slider using skateboard trucks

    DIY Camera Slider

    How to DIY Camera Slider build out of hardware store parts and skateboard trucks.


    Image of V1 of the  DIY camera slider with motor removed, already getting ready for conversion to V2
    See the DIY Camera Slider v1 build description and more images or it.

    in our build “DIY Camera Slider – V1” construction article on blogger
    http://imagemakersjourneys.blogspot.ca/2013/06/diy-camera-slider-v1.html


  • Pete’s how-to’s build a flash bracket for a monopod

    Pete’s how-to’s build a flash bracket for a monopod

    Canada Lynx

    DIY flash bracket

    How to build a DIY flash clamping bracket.

    Image of Canada Lynx created using the DIY flash bracket mounted on a monopod!
    See the Flash Bracket #1  build process and more images taken utilizing it.

    in our build “Flash Bracket #1” construction and use article on blogger
    http://imagemakersjourneys.blogspot.ca/2013/03/flash-bracket-diy-1.html


  • Pete’s how-to’s build a portable bird shooting platform

    Pete’s how-to’s build a portable bird shooting platform

    Northern Cardinal (Cardinalis)

    DIY Bird shooting Platform

    How to DIY build a portable DIY bird shooting platform.

    Image of northern cardinal shot right outside our living room window, distance to shooting platform was about 3 meters or 10 feet!
    See the platform build process and more images taken utilizing it

    in our build a portable bird shooting platform construction and use article on blogger
    http://imagemakersjourneys.blogspot.ca/2013/01/portable-bird-photography-feeder.html